Bead Soup Blog Party, Bead Hoarders Edition

Standard

Bead Soup is back! This year, Lori Anderson, added a fun twist – send your partner a hoarded/treasured/loved bead(s), along with a note, explaining why it was important to you.

I was partnered up with Janine Lucas. It took me a while to find the perfect bead to send her – since she lives in Greece, weight and size were an issue. I selected one of my first artisan bead purchases, a large glass heart in blues and pinks, as well as beads in complementary colours. I can’t remember who made the this bead – when I first started buying hand-made beads, I didn’t always keep the maker’s name. I’ve always loved its shape and texture, but even though I would frequently pull it out of my bead box, I never managed to come up with a design that would do it justice. Unfortunately, in my rush to get Janine’s package in the mail by the deadline, I forgot to take pictures. I’m looking forward to seeing what she does with her soup.

Janine sent me a lovely collection of beads, including a gorgeous plum-coloured  ceramic pendant with white dots.

P1060840

I love purple (I even have a pair of purple shoes), and I knew right away that I wanted to make a necklace. However, it took me a couple of weeks to come up with a design idea. I started working on the necklace last weekend and quickly realized my original idea wasn’t going work. Back to the drawing board.

By mid-week, I still hadn’t started my necklace. Since I work full-time, I didn’t have a lot of hours left to work on it before the Big Reveal. I know myself pretty well and it always takes me longer than I think it will to finish a project. I finally found my inspiration in a bag of “studio sweeps” purchased a couple of years ago from Yvonne Irvin-Faus of MyElements. She makes brightly coloured, funky plexiglass components. I found a tiny round charm and added a pewter bird from Green Girl Studios, to make a dangle to hang from the pendant. Once I figured out what to do with the focal, the rest of the design fell into place quickly. I wasn’t too keen on the clasp options I had on hand and thought briefly about running out to my local bead store to get something more suitable. Thanks to a late-season snow storm, I  squashed that idea.

The only “rule” for this year’s Bead Soup challenge was to use the special bead sent by your partner. In addition to the pendant, I used a couple of  the other beads Janine sent me. I’m happy with the final result. Lots of texture and movement; the tiny charm adds a pop of colour. Since I wear lots of black, the necklace will be a nice addition to my wardrobe (the leather cording has a silver lustre not evident in the photos – thnks to the snow sto snow storm also made it hard to get decent indoor photos).

P1060848

P1060852

Thanks to Janine for sending me such a lovely bead soup and to Lori, for organizing the Blog Hop. Happy hopping.

Art of Awareness Blog Hop – the power of purple

Standard

Lori Anderson is one of my favourite people – in addition to being uber-talented and creative, she’s a huge inspiration to me. So when she announced she was taking a break from the Bead Soup Blog Hop and changing things up this spring, I knew I wanted to participate. Anything Lori organizes is going to be fun.

This time, Lori teamed up with Heather Millican, of Swoondimples, for the Art of Awareness Blog Hop. Heather made a gorgeous one-of-a-kind awareness bean bead for each participant. Our job was to use our imaginations and make a piece of jewelry (although we weren’t limited just to jewelry). Given M’s challenges, ADHD seemed like a logical choice for me. Except the awareness colour is orange – not one of my favourite colours (I like it on other people but it looks horrible on me). As I was browsing through the list thoughtfully provided by Lori, I noticed that purple signifies migraine awareness. Not only is purple is my favourite colour, but I’m a chronic migraine sufferer.

I asked Heather to print “in the moment” on my bead.

P1050932

This is a reminder that my headaches, however nasty, will pass. I’m also a generic worrywort, so my bean is also a good motto for every day.

As it happens, I had a particularly nasty migraine the day I planned to make my piece. Normally, I’m not very creative or efficient when I have a headache, but the design came together quickly and relatively painlessly. I finally found my long-lost cache of jump rings, which helped make the whole project go easier.

I originally planned to make a bracelet but when I looked at my bean, I realized that the hole was drilled up and down, instead of across the bead. I decided to go with a mixed metal necklace, with my lovely purple bean as the focal.  I made a series of dangles with little bits of chain saved from previous projects  (you never know when an inch of chain will come in handy) and goodies recently acquired from Yvonne Irvin-Faus of MyELEMENTS, a lovely purple leaf bead from Heather Powers of Humblebeads and a tiny brass key. I added a length of beaded chain that I cut from a bracelet purchased from Michaels and a small piece of purple enamel chain, also from MyELEMENTS, to my “tassel”.

P1050927

I strung a couple of copper-coloured spacers, a large purple plastic trixie (from Yvonne) and a furnace glass bead with a hint of purple and gold highlights from my stash (origins unknown) with my focal. The chain came from my stash, along with a black enamelled toggle clasp from MissFickleMedia.


P1050930

It took me about 2 hours, from start to finish, which is relatively fast for me. My headache was mostly gone by the time I finished my necklace, which was a bonus.


While I really enjoyed participating in Lori’s Bead Soup Blog Hops, I think the Art of Awareness Blog Hop is my favourite. Maybe it was the colour of my bean or just taking the time to truly be “in the moment”, but the process of making my necklace was energizing. I didn’t struggle with coming up with a design, nor did I have any problems with execution.  It’s not a super-complicated design. With the exception of my awareness bean, everything came from my own stash. The end result is a funky, one-of-a-kind necklace with lots of movement and texture. I wore it today and I expect it will be a go-to piece for me all year round.

P1050928

Please check out Lori’s blog, Pretty Things, for a full list of participants and to see what she made. Enjoy your weekend!


February project – getting outside with snow dyeing

Standard

This month’s project came about literally by accident. I had been musing about doing a dyeing project for February but hadn’t gotten to actually doing anything. Last Saturday, I took a workshop on hand-embroidery at my favourite local fabric store and was chatting with the instructor, Pat Caffery, after the class. She mentioned that she hand-dyes much of the fabric she uses for her embroidery. When I expressed that I too was interested in fabric dyeing, she asked me if I had ever tried snow-dyeing?All I needed was snow, fabric dye and a plastic container with a lid.

One thing we’ve got lots of this year is snow. We haven’t broken any snow fall records, but it’s been very cold – no February thaw in Eastern Ontario. What’s fallen from the sky has stayed on the ground. Everyone, myself included, is more than a bit tired of winter. Snow-dyeing sounded like a good excuse to get outside and a lot more fun than shovelling.

I had all the supplies on hand, so as soon as I got home, I pulled on my boots and parka and headed outside. It was dark outside, but there was enough light from our house and our neighbour’s to work more (not so great for photos), plus lots of fluffy white snow within reach.

I decided to dye an old white t-shirt and a piece of fabric that was part of a failed shibori dyeing experiment last summer (I was trying for an indigo effect but the end result was a muddy, washed out blue).

P1050723

There aren’t really any directions to snow dyeing. Cathy at Orange Octopus has a post that walks through the various steps. Like many hand dyeing practitioners, she recommends pre-washing the article to be dyed with soda ash, to help set the colour. Since both pieces had been previously washed, I rinsed then out under the tap and made sure they were well wrung out. I folded up the fabric into loose pleats, but I didn’t worry about doing anything fancy with the t-shirt – just arranged it on the bottom of the plastic box.

P1050729

P1050728

The great thing about snow-dyeing is that it’s easy and self-contained. As long as you use rubber gloves, it’s practically mess-less (I couldn’t find mine, so I had purple fingers for 24 hours). I used a combination of powder and liquid dye – indigo, turquoise, fuchsia and purple. I filled up the containers, dumped the dye on top, and closed them up.

P1050735

P1050736

The trick to snow-dyeing is to let the containers sit inside for 24 hours –  a bit challenging, if you’re like me and impatient.

P1050738

I broke down and opened up the shoe boxes after 23 hours (it was Sunday evening and I wanted to finish up before supper). I don’t think the extra hour would have made much difference in terms of the end result.

For the t-shirt, I used a combination of all four colours. The purple dye was an after thought and I probably added more than necessary. Plus, it was in powder form and would have been much more concentrated than the other colours. Although purple is the predominant colour, there’s a great marbling effect on the shirt. It’s subtle but very pretty. Next time, I’ll use less dye.

Front

Front

Back

Back

I used primarily liquid fuchsia dye for the piece of material and a sprinkling of the purple powdered dye. The colour isn’t as intense as with the t-shirt (confirming my suspicions that it’s a blend of some sort). However, it’s much more interesting than it was before and the flower pattern on the fabric is much more visible.

P1050783

P1050782

I’m not sure what I’ll do with it – I’ve got about 2.5 metres, which would be more than enough to make a muslin for Grainline Studio’s Scout tee.

So a big yes to snow-dyeing. Given how much snow we have (with more on the way), I plan on playing around with different colour combinations. I found a white knit cardigan at the thrift store this week and it’s currently marinating in pink, bright blue, violent and indigo dye (so far, I find the liquid easier to work with, but fabric artists prefer powdered dyes).

P1050774

As for the March project, I’m more organized this time and it’s ready to go. It will include hand-embroidery, so I can practice my newly acquired skills.

P1050787

Silence isn’t always golden – coming to terms with a permanent hearing loss

Standard
In the last six weeks, I’ve gone from being hard of hearing to hardly hearing. In late December, my specialist inserted a tube into my right ear to help to equalize the pressure in my eardrum and allow any fluid lurking in my middle ear to drain. I’ve had this procedure done at least a dozen times in the past with very good results. This time, however, all the tube did was suck most of the hearing out of my right ear.

Since I’ve only got 15%-25% of the hearing in my left ear, I’ve always counted on my right ear to function. Having been hard of hearing for many years, I’ve developed a fair number of coping mechanisms, like reading lips and sitting at the front of the room or during a meeting, as close to the speaker as I can. Even when my right ear was giving me problems, I could usually hear well enough to follow the conversation. Not any more. I don’t hear the phone when it rings on my desk at work – I sit less than a foot away from it. Conversations are challenging – if I’m in the same room and looking directly at the person, I can catch about 50-60% of what he/she is saying. That’s provided they’re speaking clearly. But if the person speaks softly, or even worse, covers their mouth when they talk, I may only pick up every 3rd or 4th word. I know they’re speaking because I can hear sound and see their lips moving – I just can’t decipher what they’re saying.

Given the extent of my ear problems, I always assumed that my hearing would likely deteriorate as I got older. I wasn’t prepared to lose my hearing so suddenly and so profoundly. Aside from the practical aspects of trying to navigate in a noisy world, there’s an emotional cost to not hearing that I didn’t anticipate. Hearing is one of our most important senses – it connects us to the world and to those around us. I can’t hear M when he whispers that he loves me when he crawls into bed in the morning. I can ask him to repeat himself but we’ve lost that special moment between the two of us. I went to a family dinner a couple of weeks ago and I couldn’t follow the conversation. I don’t know how my cousin’s children are doing in school or my aunt’s travel plans. These seem like little things, but they’re the threads that weave people together. The reality is that if I can’t hear the conversation, I can’t participate. I’m silent.

The upside of the situation is that I’ve finally accepted I need hearing aids. I’ve resisted getting one for my left ear for years, despite suggestions from family and friends. This was due in part to an unpleasant experience with a hearing aid 25 years ago – it never fit properly and was horribly uncomfortable. But the real issue was that it made me feel like there was something wrong with me. It was clearly visible in my ear and I felt other people judged me. It doesn’t make a lot of sense, particularly when you consider that I’ve worn glasses since I was seven years old. I always wear my glasses (or contact lenses) because without them, I can’t see 2 feet in front of me or read a book. Over the years, I’ve convinced myself that getting a hearing aid was a sign of weakness. Hearing aids were fine for other people, but not for me. There are a number of stages involved in coming to terms with hearing loss and I was firmly stuck in denial.

A recent hearing test confirmed that the hearing in my right ear has deteriorated significantly since October. My specialist has no idea why and has referred me to one of his senior colleagues to try to determine what’s going on. But I’m not waiting around to find out if my hearing can be restored. I’ve decided that hearing is no longer optional and I’m getting hearing aids for both ears as soon as possible. I know from my past experience that there will be a period of adjustment. My ear canals are pretty beat up from all the surgeries I’ve had over the years and it may be challenging to get them to fit properly. People may look at me funny. So what? I’ll be able to hear M and his dad when they talk to me. I can’t wait.


The January project – a reversible apron

Standard

For 2015, I set myself the goal of completing one craft project per month. January’s project was a full-length reversible apron for a friend – a belated Christmas gift.P1050674

P1050670

[True disclosure: I finished the apron on January 30, but wasn’t able to post about it before the end of the month because I was away for the weekend and then WordPress ate the first several drafts of this post].

I’ve made a couple of half aprons in the past, including a reversible one for my mother a couple of years ago.

P1050683

However, this was my first time making a full-length one. For the apron itself, I used fabric from my stash, including a red and green holiday print that I bought at a flea market. I love Christmas aprons, but their really only wearable for about a month evry year. Although the fabric isn’t overly christmasy, I wanted my friend to be able to wear her apron any time of the year, so I chose an abstract stripe in bright colours for the other side. I used a contrasting green with tiny white squares for the neck and waist ties that I found at my local fabric store.

P1050689

I couldn’t find any apron tutorials online to fit my friend, so I drafted my own pattern based on the one of my own aprons, using XL women’s measurements I found on a website: chest = 43 1/2 inches; waist = 35 inches; and hips = 45 1/2 inches.

P1050558

I used newspaper to make the pattern, as it was all I had on hand. I wasn’t worried about the newsprint leaving marks on the fabric, since both pieces were brightly coloured with lots of pattern. I probably wouldn’t use a newsprint pattern on light fabric, but it worked just fine for my purposes. When I was finished with the pattern, I just tossed it into the paper recycling bin – extra points for being environmentally friendly.

P1050560

For the ties, I cut out 2 pieces 32 x 4 inches for the waist and one 22 x 4 inches for the neck piece. I was guessing about the length of the ties. The final measurement is about 17 inches, so I ended up cutting an inch or off both ends of the neck piece – 20 inches would have been plenty long enough. I angled the ends of the waist ties, following the “Big Bow and Sash Sewing Tutorial” on The Mother Huddle. Rather than eyeballing the angle, I measured it out with a ruler and marked it with tailor’s chalk, which made cutting a crisp angle a snap.

P1050580

Since the main fabrics for the apron were fairly busy, I decided to keep the decorative elements to a minimum. I came across a tutorial from Sew4Home for the citrus holiday hostess apron, that used jumbo rick rack, inserted into the top seam of the apron. I found some pale blue jumbo rick rack at my local fabric store that matched the blue in both main fabrics. The instructions in the tutorial are quite clear about how to put the rick rack in the seam and how to position the neck ties behind the rick rack. Except there’s no explanation of how to position the rick rack correctly so it doesn’t bunch up when you sew up the side seams.

P1050609


I’ve come to the conclusion that there must be some sort of secret rick rack club – none of the other tutorials or resources I consulted provided any directions on how to correctly line up the rick rack so it lies flat in the seam (even my go-to apron resource, A is for Apron only explained how to insert the rick rack into the top of a pocket). I ended up ripping out the rick rack out of the apron 2 times and making 2 samples before I figured  it out. I had to make an emergency trip to the fabric store one Sunday morning to buy more rick rack. Even on my third try, I still had to adjust my seam allowance so the stitching caught the rick rack at the right point. Very happy with the final result.

P1050690

If this hadn’t been my January project, this is probably the point where I would have tossed the whole thing aside and stuffed it into the recesses of my sewing basket. Once I had conquered the rick rack, I added a red button on the Christmas side, right below the ties, for a bit more visual interest.

P1050646

P1050669

P1050667

I’m not going to lie – rick rack crisis aside, there more than I few moments when I could have cheerfully walked away from the sewing machine and not looked back. A more experienced sewer could have knocked off this project in weekend (or less). It took me several evenings and a good chunk of two weekends to complete the entire project. However, I learned a few important lessons that will hold me in good stead for future projects.

Firstly, tailor’s chalk is my new favourite sewing tool. It allowed me to make much more precise markings than straight pins. After I cut the two main pieces out, I folded them in half together and traced the necessary adjustments directly onto the fabric with the chalk. It rubs off, so making corrections was easy. Tailor’s chalk doesn’t leave any residue on your hands. I was using yellow chalk and it didn’t leave any marks on my fabric.

Secondly, not all online tutorials show you every step of the project. I appreciate that people take the time to post tutorials online and find them incredibly useful. However, in my experience, sewing tutorials often assume the reader has some sewing experience and can fill in the blanks. If you’re a beginner like me, this can create some frustrating moments – when you discover that your seams look wonky because you haven’t pressed them flat or your corners are round instead of square because you didn’t mitre them. I’m still going to keep checking out online tutorials but I’m going to read them very carefully before I start a project. And then re-read them. FYI – I’m working on a step-by-step tutorial on decorating a seam with rick rack.

Finally, my January project underscored the old adage, “practice makes perfect.” The top-stitching on the apron ties is a little crooked. I pulled out the worst sections with my handy seam ripper, but decided not to drive myself crazy trying to sew it in a perfectly straight line. For one thing, the fabric and the thread are almost the same colour and for another thing, you can’t see the top-stitching when the ties are done up. I top-stitched around the entire apron and to my surprise, my stitching was much straighter and more consistent. It was nice to see a noticeable improvement in a short period of time.


So that’s it for January. One project down, 11 to go. Haven’t decided on the February project yet – it’s a short month, so I better get busy.

Special thanks to M for taking time from playing MindCraft to take photos of me modelling both sides of the apron.


Hello 2015

Standard

It’s a new year and it’s a good time to reflect on 2014 and think about the possibilities for 2015. I’m not big on resolutions but I like setting a few manageable goals to guide me over the next twelve months.

I did pretty well in meeting my goals for 2014. On the sewing front, I started and finished my Staples dress.P1040384

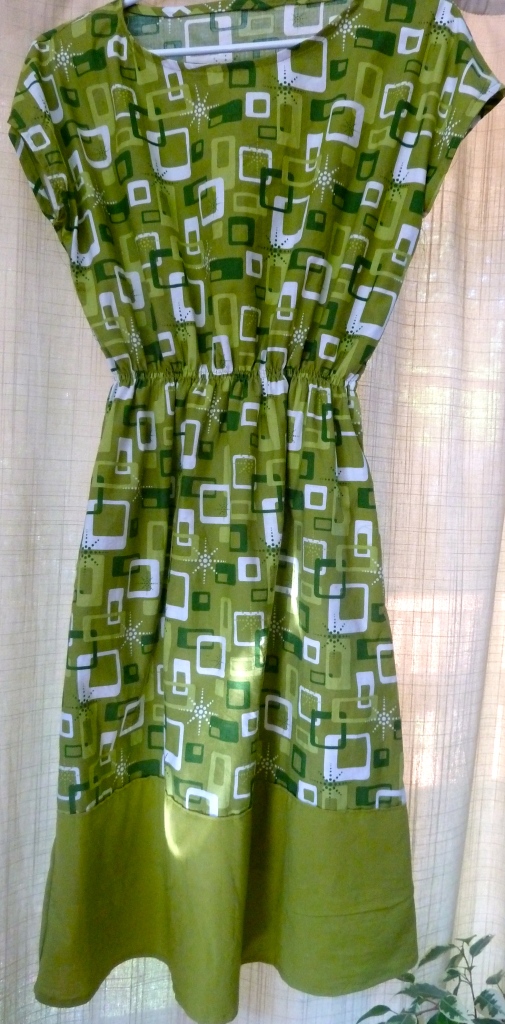
I also made a zippered sleeve for my laptop, which is very useful.

P1040524

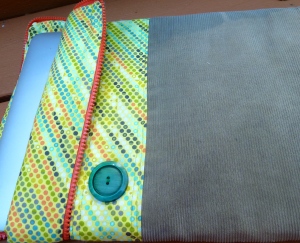
The zipper is sewn in a little tight (it was my first time putting in a zipper), so it jams from time to time. Usually not a big deal, except for the time it decided to seize up entirely as I was going through security at the airport. Fortunately, the security guard was very nice and didn’t demand that I take my laptop out of the case (that would have involved scissors).

I made a few pieces of jewelry, for the Bead Soup Blog Hop and gifts for a few friends and relatives.

P1040121

Earrings – Bead Soup 2014

BD gift for a favourite niece

BD gift for a favourite niece

I finally organized my craft space, which was a 2014 goal (no pictures until I can improve the lighting).  It’s small but functional. While my paper and sewing supplies are easy accessible, I still need to spend a bit more time on organizing my beading supplies. Mostly because I need to find my box of jump rings – as I discovered recently, it’s pretty hard to make a piece of jewelry without them. In the course of the cleanup, I collected and sorted all my art beads and various hand-made components to several containers, so when I do find the jump rings, I’ve got lots in my stash to work from. So much, in fact, that I don’t need to buy any beads.

The one thing I made lots of this year was cards. Once my supplies were in one place, it was relatively easy to spend an hour putting together a card or two. In November, my sister-in-law and I went out of town on a crafty weekend. It was organized by a woman who sells StampinUp products and she brought all her own dies, punches and equipment to use. It was scrapbooking/card making heaven. It was fun and I got a head start on birthday and Christmas cards.

Birthday card for a friend

Birthday card for a friend

Crafty weekend Christmas card

Crafty weekend Christmas card

Christmas card - my own design

Christmas card – my own design

However, my SIL and I discovered that while we like making cards, 12 hours a day, two days in a row is a bit much for us. Between the weekend and my own time, I made about 25 Christmas cards. Unlike last year, I actually sent them out too.

2014 was a good year for M. He wasn’t too happy with his marks at the end of Grade 7. We didn’t make a big deal about it as neither his dad nor I care much about his grades. He’s a bright kid and we figure if he does his work in class, he’ll do fine. Sure enough, since he started Grade 8, M’s been completing most of his assignments and his first term grades were significantly higher than last year’s. He got a zero on a French assignment that he didn’t hand in (and no sympathy from his parents who thanked his teacher – much to her surprise). When he told me about it, he said that would be the last time that would happen. He was recruited by a couple of very high-achieving girls to be on their team for the school’s annual stock market event, which was very good his ego, even though he told me they were bossy. He’s even keeping up in Art – the bane of his existence last year. He still has the same teacher as last year and while they’re getting along better this year, it is not his favourite subject. He snapped at me when I suggested he could take it next year, in high school.

That’s our big family challenge for 2015 – M starts Grade 9. I expect I’m a lot more nervous about it than he is. He decided he wanted to go to the same school as most of his friends, which is fine as it’s a good school and has a good support system for ADHD students. It’s closer than the middle school, so he can walk. But it’s big – well over a 1000 students. That’s a huge change compared to the program he’s in now, which has less than 200 kids. I worry that he’ll fall through the cracks or fall in with a “bad” crowd. Even with his meds, M is pretty impulsive. The challenge with having a child with ADHD, is that as a parent, you’re never quite sure if silly behaviour is normal 13-year-old boy stuff (with two younger brothers, I know teenage boys do goofy things) or the attention deficit. It’s reassuring that M tells me that drugs and drinking are really stupid, but I fully expect he’ll drink before he’s 18 and try at drugs at some point – to think otherwise is naive on my part. I do try to live in the moment and enjoy my child – he’s much easier to live with at 13 than he was at 7 or 8, despite the occasional bouts teenage angst/surliness. But past experience has taught me that if I don’t acknowledge possible M’s challenges and work with him to plan for them, the results are usually messy and stressful for all concerned. M’s in a good space this year and I want to help him maintain his forward momentum, throughout the rest of Grade 8 and into Grade 9.

In terms of my goals for 2015, I’m going to continue to run and go to the gym regularly. After a hiatus of several years, I started running again in July and ran 3x a week until the late fall. Between the time change and a couple of illnesses, I dropped to 1x a week and then before Christmas, after a bad cold, I stopped altogether for a few weeks. However, I’ve discovered that I really love running and am going to work harder to get out more often. I’ve already been out twice since Christmas and will start going out for my long runs on Sundays again. When we finally get some snow, I can go x-country skiing on Sunday mornings with friends. Going to the gym a couple of times a week breaks up my routine, plus it’s helps strengthen my muscles for running.

My personal challenge for 2015 will be dealing with my hearing. It’s gone from being a minor annoyance to being an impediment. M now automatically puts the closed caption function on when we’re watching TV together, but following along in large groups, movies and plays is often a struggle. I attend a lot of meetings for my job, so being able to follow the conversation is important. I’m getting a hearing aid for my left ear, which is a big step for me. However, I continue to have issues with my right ear. At my request, my specialist put a tube in it just before Christmas and my hearing is worse than it was before. Having a hearing aid in one ear may improve my overall hearing, so I’ll wait and see. I keep crossing my fingers that my right ear will improve. However, in the grand scheme of life, a hearing problem is a minor bump.

For 2015, I’ve decided to complete at least one craft project a month – sewing, knitting, jewelry, etc. Cards won’t count, unless it’s a particularly elaborate project, a  set of cards or mastering a new technique. A project a month may not sound like a big deal to most people, but it’s realistic for me. I’m going to do my best to start and finish the project in the same month, but I may use this as an opportunity to complete a couple of works-in-progress. By December 31, 2015, I want to have completed 12 projects.

I’ve already got the January project lined up. It’s a sewing project, as a belated Christmas gift for a friend.

P1050512

2015 project #1

I’m not going to commit myself to posting the finished project on a specific day of the month. I want to nurture my creativity, rather than setting conditions that will get in my way. I haven’t selected any of the projects beyond January, so that will be part of the fun each month.

Best wishes for a happy and healthy 2015.

2nd Annual Bead Hoaders’ Blog Hop – late to the party

Standard

I made a necklace for the blog hop and had taken some photos too. The reason I’m late posting is that I came down with a cold on Friday. After making Christmas cookies, volunteering at the craft sale at my son’s school (which included donating bags of said cookies), and doing a little Christmas shopping, I ran out of steam and had a nap (several, as it turned out).

The necklace was a gift for one of my favourite colleague’s who retired recently. I made a focal bead, using a Jade Scott owl pendant and a copper disc which I distressed, using Ranger’s metal patina in verdigris.

P1050405

Although I’ve had the patina for over a year, I’d never actually used it before (my stash includes more than just jewelry components). I scratched the surface of the disc with fine sandpaper and applied the patina on both sides, as per the directions on the bottle. Big impact with minimal work.

P1050406

I polished the edges of the disc with the sandpaper to give it a bit more detail. I attached it to a length of fancy round cooper chain that had a natural patina – I don’t know if it came that way or it’s just been in my box of chain for a long time. Either way, it was a perfect match for the focal bead.

P1050404

Attaching the focal and the clasp to the chain turned out to be a bit tricky because I couldn’t find my jump rings. Over the last several months, I’ve slowly been organizing a craft space in a corner of my basement (aka, the craft cave) and most of my supplies are sorted. Except apparently, the jump rings. I looked up and down for them several times, to no avail. I managed to find 4 or 5 small gun metal ones, and I used them to attach the clasp, figuring no one would notice the difference in colour at the back of the necklace. The pendant came with a jump ring, but I didn’t like how the owl ears poked up above the metal disc. I had cut a link off the chain so it was the right length and I used it as a jump ring, to drop the owl down a bit further. It did the trick perfectly, plus it looks like part of the chain.

P1050407

Thanks to my MIA jump rings, I could only make one piece for the blog hop. However, I also made my colleague a card from materials in my stash, including a vintage button.

P1050400

I probably won’t be making any jewelry for Christmas. But as soon as the holiday rush is over, I’m going to track down those darn jump rings, so I can dive back into my stash and have some more fun and perhaps learn another new technique or two.

P1050403

Frightenly silly Halloween wreath

Standard

M is almost past dressing up and going out for Halloween – it’s only 5 days away and he’s still on the fence about whether or not to go out. Regardless of what he does, we always get trick or treaters. To dress up the door, I decided to make a Halloween wreath.

The wreath was essentially a re-fashion of one I made with a feather boa last year.

P1030397

I rounded up some spooky decorations from Michaels and the local dollar store (plastic chain with skeleton, rubber bats and an acid green garland with skeleton heads) and raided our box of Halloween decorations (spider’s web, hand and silver skull). The piece de resistance was a huge fake spider that I found at a church bazaar while I was helping out some friends out with their table.

P1050317

Super scary spider

After removing the feather boa, I wrapped the wreath in metallic burlap ribbon and the skeleton garland. Rather than hot gluing, the decorations to the wreath, I used pins and wire, in case I want take it apart next year

P1050316

Creepy hand and skeleton

P1050318

Spooky skull

It took me a couple of hours and about $7 to make.

P1050297

Not sure it’s going to terrify the trick or treaters, but it make may some of them laugh.

P1050311


P1050314


Grade 8 (where did the years go?)

Standard

EIGHTM started Grade 8 this week. He was in Grade 7 last year, so logically he’s in Grade 8. I’m trying to figure out how we got to the last year of middle school so fast. It doesn’t seem that long ago that I waited with M for the bus for the first day of Grade 1 (an ill-fated foray into the gifted program which lasted barely two weeks) and waited anxiously for him to come home safely so we could talk about his day. The intervening years have had their ups and downs. Some of them seemed like they would never end – endless trails of suspension notices or meetings with officious school board staff. The last couple of years, however, have been less eventful. M has become increasingly able to manage his behaviour and requires less and less in the way of parental interference. Without the drama, time speeds up. Last year flew by in a flash.

On the first day of school, M was up and out of the house more than an hour before school started, anxious to see his friends and find out who was in his class. I still wanted to hear about his day when I got home, but it’s getting him to talk to me is a matter of timing. His focus is turned increasingly outward, away from me – it’s all about his friends, Instagram and what’s on YouTube. I expect that if I catch M at the right moment, I’ll hear a little bit about what’s happening at school. I’ll probably meet with his home room teacher once or twice between now and June. But he’s becoming his own person, with a distinct persona that is largely separate from me. Next year, M will start high school. In five years, he’ll be graduating high school. Slowly, surely, he’s cutting those apron ties – we’ve only got a few “first days of school” left to share.

All this is a cause for celebration. I want M to continue to grow and thrive. As much as I want our relationship to stay the same, I know that’s neither practical nor desirable. Relationships aren’t static and the parent-child dynamic changes constantly. Sometimes several times in one day. M was sweetness and light when he in the mornings this week and was Captain cranky-pants at the end of the day. On the first day back, he yelled at me when I called after school to find out if he got caught in the rain coming home (well, duh). and hung up the phone. He’s been pretty even-tempered over the last few weeks, but going back to school means a big change in routine. While M did have to get up and out of the house 5 days a week for camp, playing tennis all day was fun. Even the excitement of seeing his friends is slightly overshadowed by the prospect of following rules, daily schedules and class work. Since M’s school isn’t big on homework, except in the case of unfinished assignments, I pointed out to him that completing his assignments in class would reduce the likelihood of having to do work at home.

Whether he follows this nugget of wisdom is up to him. He’s perfectly aware how much he’s doing (or not doing) at school – on a recent drive past his future high school and he told me he’s probably have to do some work in Grade 9, because “they can fail you in high school.” I’m not sure this is true, but he needs to figure out how to navigate this year and the following four on his own. I can encourage him and help him figure out what he needs to succeed, but the rest is up to him.

Even though our relationship is changing, he still needs me to make him pancakes in the morning and help him put his lunch together. I get the occasional hug and kiss, mixed in with world-weary tone and rolling of eyes. My sweet boy is growing up.


Refashioning a summer blouse

Standard

Last summer, in the midst of a heat wave, I went shopping for a lightweight sleeveless shirt. Rather than a knit, I was looking for a loose casual blouse in a woven fabric that I could wear on days when the mercury was pushing +30 degrees Celsius. As it often happens, I’m either ahead or behind the fashion curve and I couldn’t find anything sleeveless that fit the bill. Sweaty and tired, I headed off to Value Village to see if I could find a shirt that I could refashion.

Truth be known, I’m not a big VV fan. As thrift stores go, it’s expensive and I find it disorganized and grubby. But I found the perfect shirt on my first trip – a light pink woven cotton blouse from H&M with a black and cream floral pattern and buttons down front.

P1020895

It cost $9, which is a bit pricy for a thrift store blouse, but it’s nice fabric and cheaper than making a whole new blouse. It had cap sleeves and was too big for me, but seemed like a reasonable refashion project.

P1020899


P1020905

Once I got home, I got out my seam ripper and took off the sleeves.

P1020908

I hemmed the armholes and realized I needed to shorten the shoulder straps, as it was still too loose.

P1020911


Looked easy enough and I figured it would take me and hour, two at most to finish the blouse.

As usual, I vastly underestimated the length of time it would take me to finish a sewing project. This was pre-Staples dress and I was fixated on perfection. Taking the shoulder straps apart to shorten them was easy; sewing them back together was finicky. After numerous attempts to sew the shoulder straps together so the centre seams matched on both sides of the strap so it would lie flat, I gave up. I stuffed the blouse in my sewing bag and quickly forgot about it.

Fast forward to this summer. This time around, I basted the edges of the front and back of the straps together before I sewed them together.

P1040675

This held the two pieces together so when I folded the wrong sides together, I had a reasonably flat straight edge. In short order, I had sewed both straps together and top-stitched the outside edges. Except for the hem, I was done!

When I looked in the mirror, however, I realized one strap was about an inch longer than the other. Plus the blouse still looked baggy on me.

P1020919

Back to the sewing machine. This time, it was a slog. My mother hemmed and hung a curtain and had made and eaten her lunch by the time I was finishing up my blouse. My machine kept eating my thread, so I would get to the end of a seam to discover there was no stitching – this happened 3 times on one seam alone. I was getting really frustrated until I discovered that the bolt holding the needle down was loose. This seemed to fix the problem and I was able to sew complete seams with thread.

To improve the fit, I took out nearly 1-1/2 inches on either side of the bottom half of the blouse – I recently bought some tailor’s chalk and it’s a great for marking out the stitching line.

P1040532

A quick machine hem and a second row of top-stitching along the edge of the armholes, so they would lie flat and finally, my blouse is finished. It’s fits nicely but it’s loose enough to be comfortable on a hot day. I’m checking out the weather, hoping for a nice sunny warm day to wear it.


P1040678

P1040679